And I can't get my head straight. I have been super tired but this Sunday I am gonna get it in gear. Yes, Yes I am. The first thing I am gonna do is not bite off more than I can chew. So I am going to complete 8 simple projects... which project is the question.
1) Birthday card for friend
3) 1 tiny movie with the boy, and unicorns (5 second short)
4) 1 jellyfish website (easy two pager, with a wordpress back end)
5) I skully necklace
6) Banner for storytelling website
7) Program Template for storytelling website
8) Signage for Storytelling website
Friday, January 29, 2010
Monday, January 18, 2010

#350 Tree choker necklace
I found this cool tree ditty stamped out of some kind of flexible steel and powder coated. It was just too cool to pass up. I put it on a semi thin black ribbon and finished the ends in sterling silver and a magnetic clasp.


#351 Steampunk decon cuff braclet
This one was inspired by my friend Dixie, who spotted something like it in one of the crafty mags.


#352 Crystal earrings
I needed neutral earrings but I am not a fan of most neutrals. I think these do the job.


Wednesday, January 13, 2010
#355 Ducks Illustration for T-shirt
So this is something I am gonna silk screen on a various bits of fabric and then sew on a shirt. I may or may not top stitch the dotted lines between the ducks. Depends on if I get that stippling foot I have been after. ;)
Now to technically I am counting the illustration as one project and the silk screen as another cause they can function independently :)


Now to technically I am counting the illustration as one project and the silk screen as another cause they can function independently :)


Tuesday, January 12, 2010
#356 Graphics for Bawdy Storytelling
There is a whole series of graphics I did for Bawdy Storytelling that I just did. I had some qualms about posting design work but then again I put a lot into it and it is a project and it is creative. So there. ;)

You can check out all the work that was done for January 2010 at bawdystorytelling.com
WARNTING: Bawdystorytelling.com is NOT SAFE FOR WORK
You can check out all the work that was done for January 2010 at bawdystorytelling.com
WARNTING: Bawdystorytelling.com is NOT SAFE FOR WORK
Tickled fricking Pink! Made best of list for 2009!!
Holy Shmoly! I made the best of list for 2009 on Craftster. High Praise indeed.
Wow!
http://www.craftster.org/forum/index.php?topic=297938.0;all

I heart Craftster!
Wow!
http://www.craftster.org/forum/index.php?topic=297938.0;all
Monday, January 11, 2010
#357 Long Vest Recon
So I picked this church lady jumper dress up at the Goodwill a million years ago. Seriously a million. And had it on the dress form off the dress form and back again a million times. What I wanted was a neo Victorian black on black sexy vest. And I finally finished it. Whooo.
Action Shot's to come soon I swear. I am just trying to enter these things in the order I am doin' them :)
Action Shot's to come soon I swear. I am just trying to enter these things in the order I am doin' them :)
#358 Trunk Cushion or what to do with all your tiny scaps
What the hell to do with all the lame scraps. I made a cushion to go on the trunk at the end of my bed so I would stop snagging my clothes on the old wood bit. Then I made a cushion cover that could be taken off and washed.
It is done with this awesome dark purple flat sheet from Ikea. The pictures are kinda sucky cause I don't have the best lighting in my room.

It is done with this awesome dark purple flat sheet from Ikea. The pictures are kinda sucky cause I don't have the best lighting in my room.

#359 Red Bedspread Fix up
So this silly bedspread is a project that has been hanging over my head for over 2 years. Every time I wash the duvet cover I keep meaning to fix the frog. They were poorly designed to begin with. And the duvet slides around it it. So I attached ribbons at several places along the corners and sides if both the duvet and duvet cover so it would stay in place. This weekend I fixed the frogs that are part of the main closure.


#360 Baby Quilt for my crazy friends
So I have some crazy wonderful friends. Really wonderful and really crazy. And 10 years my senior. Who just popped out a baby. A brand new one. Anyhow, to welcome this kiddo I made a quilt, had all the kids in our community write stuff on it with fabric markers then did some fancy stitching and gave it to them. Technically I did this half 2009 half 2010 but I finished it today so it counts by golly.


#362 Flowery Hat Pin
So I wasn't feeling very girly and had a few min to spare. I dipped into my scrap bag and made this number in a rush. Will improve on it for sure soon.


Wednesday, January 6, 2010
#361 Watercolor backgrounds
These are watercolor backgrounds for a friends business cards. I may use them whole or just a blow up bit of them as the card backgrounds. I will post the final cards when they are done to this post too.


Tuesday, January 5, 2010
#362 "Bustly" Wrap Top
I made this one to have a semi bustle skirt under a leather corset I was gifted (from which I will swipe a pattern). But I believe it stands along as a top. And I know I keep saying action shots coming soon. But really they are. One of my staycation goals is to do a photo shoot. Oh, and lean to use the video function on my little camera. It is a really simple approach to modifying the pattern.

I used a stretch knit that draped really well and didn't unravel.
 First I started with the top of Butterick #5001 and modified the sleeves. You should note that I have made this one before and I have modified how I put it together to give me a better fit. Also for this particular top I modified the back to be more scoopy as I intended to wear it off the shoulder which only sort of panned out.
This pattern has a 3/4th sleeve. But I wanted something longer and more flowing. This is how I modified the sleeve pattern. I did it rough without using a ton of math or precision. It is worth doing again only in a more clean way. The fit was nice.


When I attached it I started by pinning the center front of the circle to the center front of the top then I pinned from side to side pinning it evenly around to the back When I got to the back section I could see how much extra I had and I just pinned in pleasing pleats to take care of it and give a nice drappy bustle effect.

I used a stretch knit that draped really well and didn't unravel.
 First I started with the top of Butterick #5001 and modified the sleeves. You should note that I have made this one before and I have modified how I put it together to give me a better fit. Also for this particular top I modified the back to be more scoopy as I intended to wear it off the shoulder which only sort of panned out.
This pattern has a 3/4th sleeve. But I wanted something longer and more flowing. This is how I modified the sleeve pattern. I did it rough without using a ton of math or precision. It is worth doing again only in a more clean way. The fit was nice.

Then instead of putting the skirt on it I put a very short circle skirt on it... I wanted that frilly look. Now I made the circle skirt a bit bigger than the circumference of the top and I gathered it in the back to form that bustley look.
This is how the math broke down (click the image to get a bigger look and readable captions).

Monday, January 4, 2010
#363 Stretchy Mermaid Skirt
I was gifted with this fantastic Mermaid skirt done out of rubber. And it looked awesome - 20 lbs. ago. I loved the design though and I needed a mermaidy costume for new years .... so of course at the very last min I was compelled to make one out of this stretch fabric I had bought to make a couple of work dresses. It was a medium to light stretch fabric with lots of stretch and drape.
I was gonna do my usually bunch of tiny drawing but this is complicated enough that will post a video... well as soon as I do the next skirt. Which will be pretty soon. Action Shots though of the one I made NYE coming very very soon.

I had researched pencil skirts before and found things like this:
http://www.whatthecraft.com/tuts/pencil.htm
http://wkdesigner.wordpress.com/2009/01/01/pencil-skirt/
Step 1
layout the dream skirt and rough trace out around the front and back, marking the darts and details but not the ruffle hem of course.
Step 2
Clean up the tracing a bit with a ruler. Take off the waist band etc. Fold each piece down the middle and make sure they are roughly true side to side and front to back.
Step 3
Math.. it is time for math. Take your measurments:
Now you want to modify your rough pattern. The goal is to have a front and a back piece were the back piece is about 2 inches wider than the front.
So lets us my really numbers and I will show you the math I used:
My high waist was 44/2=22
My waist was 46/2=23
My hips was 56/2=28
Now I am going to take two inches from that number and give it to the back of the skirt to get my measurements For example with the numbers above I would get
Front
High Waist 20
Waist 21
Hip 25
Back
High Waist 24
Waist 25
Hip 30
Now take that math to the paper and make it so... you increase (or decrease) the skirt width by adding to the middle where you folded it in half.
Measure twice and mark it out and then follow the final desired lines of the skirt with a sharpie. Transfer darts at this point.
Lay down a clean piece of tracing paper over your pattern and trace out the pattern for the skirt front and skirt back. Be careful and mark each piece so you know what is what. You will notice that at this point that I didn't mention seam allowances. I should have. I only add seam allowances to the top and hem and I do it at the time of cutting. I leave them out of the sides as we are using stretchy material and we want a fitted look.
Step 5
Now the mermaid tail is a bit harder to explain. I did it mostly by tracing and modifying but you want a shape like this front and back.

Keep in mind you can cut it from two pieces instead of one big perfect piece. I did. The name of the game is to ensure that the radius of both inner circle cut outs equals the circumference of the bottom of your skirt when added together. ;) Do this on paper or out of scrap fabric first. Cause you will catch mistakes way, way easier.
Step 6
Cut out the front and back using the pattern you made. Add a .5 inch seam allowance to the bottom and top of the skirt. Sew the side seams.
Step 7
Try it on and mark the darts in the back or ensure that the marks you transffered are in the right place. It you changed the size on the piece they will most likely have to be moved.
Mark them then sew them.
Step 8
Next make your waist band. It should be one piece of cloth 5 inches wide and as long the circumference of the top of your skirt or your high waist (that should almost perfectly the same right now) if they are different use the smaller of the two. Add and inch.
Now sew the short end of the band together so you have a big loop of fabric.
Fold it in half with the raw seam to the inside. Fold it in half and mark the center front of the waist band then fold again to mark the center sides. Pin it to the skirt by placing the seam in the waist band at the center back of the skirt. The mark you made for center front at the center front of the skirt and then the center sides roughly at the side seams. You should be doing this with the skirt right side out.
Sew on the waist band stretching the skirt a tiny bit evenly as needed You shouldn't get any ripples or ruffles when worn.
Step 9
Pin and sew on your ruffle
Finish as desired.

I had researched pencil skirts before and found things like this:
http://www.whatthecraft.com/tuts/pencil.htm
http://wkdesigner.wordpress.com/2009/01/01/pencil-skirt/
Step 1
layout the dream skirt and rough trace out around the front and back, marking the darts and details but not the ruffle hem of course.
Step 2
Clean up the tracing a bit with a ruler. Take off the waist band etc. Fold each piece down the middle and make sure they are roughly true side to side and front to back.
Step 3
Math.. it is time for math. Take your measurments:
- High waist
- low waist
- Hip
- From High waist to Hip
Now you want to modify your rough pattern. The goal is to have a front and a back piece were the back piece is about 2 inches wider than the front.
So lets us my really numbers and I will show you the math I used:
My high waist was 44/2=22
My waist was 46/2=23
My hips was 56/2=28
Now I am going to take two inches from that number and give it to the back of the skirt to get my measurements For example with the numbers above I would get
Front
High Waist 20
Waist 21
Hip 25
Back
High Waist 24
Waist 25
Hip 30
Now take that math to the paper and make it so... you increase (or decrease) the skirt width by adding to the middle where you folded it in half.
Measure twice and mark it out and then follow the final desired lines of the skirt with a sharpie. Transfer darts at this point.
Lay down a clean piece of tracing paper over your pattern and trace out the pattern for the skirt front and skirt back. Be careful and mark each piece so you know what is what. You will notice that at this point that I didn't mention seam allowances. I should have. I only add seam allowances to the top and hem and I do it at the time of cutting. I leave them out of the sides as we are using stretchy material and we want a fitted look.
Step 5
Now the mermaid tail is a bit harder to explain. I did it mostly by tracing and modifying but you want a shape like this front and back.

Keep in mind you can cut it from two pieces instead of one big perfect piece. I did. The name of the game is to ensure that the radius of both inner circle cut outs equals the circumference of the bottom of your skirt when added together. ;) Do this on paper or out of scrap fabric first. Cause you will catch mistakes way, way easier.
Step 6
Cut out the front and back using the pattern you made. Add a .5 inch seam allowance to the bottom and top of the skirt. Sew the side seams.
Step 7
Try it on and mark the darts in the back or ensure that the marks you transffered are in the right place. It you changed the size on the piece they will most likely have to be moved.
Mark them then sew them.
Step 8
Next make your waist band. It should be one piece of cloth 5 inches wide and as long the circumference of the top of your skirt or your high waist (that should almost perfectly the same right now) if they are different use the smaller of the two. Add and inch.
Now sew the short end of the band together so you have a big loop of fabric.
Fold it in half with the raw seam to the inside. Fold it in half and mark the center front of the waist band then fold again to mark the center sides. Pin it to the skirt by placing the seam in the waist band at the center back of the skirt. The mark you made for center front at the center front of the skirt and then the center sides roughly at the side seams. You should be doing this with the skirt right side out.
Sew on the waist band stretching the skirt a tiny bit evenly as needed You shouldn't get any ripples or ruffles when worn.
Step 9
Pin and sew on your ruffle
Finish as desired.
Ruffled Sweater shrug
I was inspired to do my own version after seeing this tutorial at Threadbanger:
But I wanted one that would work for a girl with my abundant proportions as well as offer a bit more coverage.
Action Pic's to come soon. I swear. Oh, and unless I make another one I am not counting this as part of the Project a Day dealy.
You will need:
With the sweater on right side out mark down from the center front, under your boobs and too the small of your back or where you want the garment to end in the back.

Step 2
Take the sweater off and crease it so it is folded in half center and back. Now even up the marks you made.
Carefully cut on the marks you made. Cut the bottom edge first. then cut up the front... ONLY CUT ONE LAYER when you cut up the front.

Step 3
Now try it on. It if is too baggy in the body pinch in the side seams. It it is too back in the back make darts from the bottom edge.

Step 4
Measure out all around the edge (but don't stretch it out). Take this number and multipy it by two. This is the minimum length the strip will work for ruffles to be. Take the left over bits of sweater and make a strip this long as wide as desired or possible. I don't use the ribbing a the bottom of the sweater unless I absolutely have to and if I do I put them in equal bits at the end of my long strip.
Step 5
Applying the ruffle. Now keep in mind the idea behind this bit is to get an even presentation down the center of the front. So start at the collar and take your long strip of sweater bits work your way around the collar pinning the ruffles. Switch from side to side as you do this so you end with an even-ish look and so you have enough to go all the way around the sweater edge ending in the middle back.
Step 6
Once you have your ruffle VERY securely pinned down and looking just so use a zigg zagg stich on your machine to sew the ruffle on. Stretch out the sweater just a little bit as you sew to get a better curly edge look flowing into the pinned ruffles. Make sure you catch both edges of the sweater well when you sew. Sew this seam again if you need to to keep it secure.
Optional. You can go around the edge of your ruffle with a zig zag stitch to stop it from unraveling over time... I don't because I like that frayed deconstructed look.
But I wanted one that would work for a girl with my abundant proportions as well as offer a bit more coverage.
Action Pic's to come soon. I swear. Oh, and unless I make another one I am not counting this as part of the Project a Day dealy.
You will need:
- One 100% wool man's sweater (not a bulky knit and the sweater should fit you but not be tight or droop off your shoulder's)
- scissors
- Chalk
- pins
- sewing machine
- matching thread
With the sweater on right side out mark down from the center front, under your boobs and too the small of your back or where you want the garment to end in the back.

Step 2
Carefully cut on the marks you made. Cut the bottom edge first. then cut up the front... ONLY CUT ONE LAYER when you cut up the front.

Step 3
Now try it on. It if is too baggy in the body pinch in the side seams. It it is too back in the back make darts from the bottom edge.

Step 4
Measure out all around the edge (but don't stretch it out). Take this number and multipy it by two. This is the minimum length the strip will work for ruffles to be. Take the left over bits of sweater and make a strip this long as wide as desired or possible. I don't use the ribbing a the bottom of the sweater unless I absolutely have to and if I do I put them in equal bits at the end of my long strip.
Step 5
Applying the ruffle. Now keep in mind the idea behind this bit is to get an even presentation down the center of the front. So start at the collar and take your long strip of sweater bits work your way around the collar pinning the ruffles. Switch from side to side as you do this so you end with an even-ish look and so you have enough to go all the way around the sweater edge ending in the middle back.
Step 6
Once you have your ruffle VERY securely pinned down and looking just so use a zigg zagg stich on your machine to sew the ruffle on. Stretch out the sweater just a little bit as you sew to get a better curly edge look flowing into the pinned ruffles. Make sure you catch both edges of the sweater well when you sew. Sew this seam again if you need to to keep it secure.
Optional. You can go around the edge of your ruffle with a zig zag stitch to stop it from unraveling over time... I don't because I like that frayed deconstructed look.
Saturday, January 2, 2010
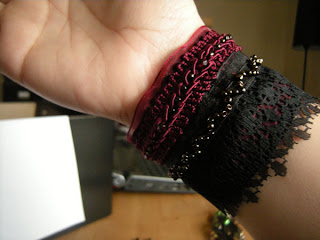
#364 - Recon'ed Cuffs
I am not gonna do a tutorial for this one cause well they are just cuffs.
I took the scraps from #365 and added a bit of ribbon and some grommets and here we are. Oh, the lacing is made of the seams I cut off the sleeves of of the shirt.

I took the scraps from #365 and added a bit of ribbon and some grommets and here we are. Oh, the lacing is made of the seams I cut off the sleeves of of the shirt.

Subscribe to:
Posts (Atom)