Tuesday, August 18, 2009

Giant Man's Shirt to Cute Dress

Before: Big Box of a man's shirt with cool blue retro workman's stripes. I only wish I had a blue "bob" batch for the final project.


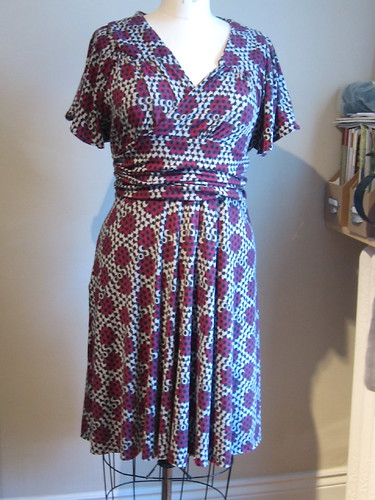
After: Cute Dress

Materials

  • 1 large mans shirt (really big is better) Try it on and it should be summer length on you and have enough ease on in the body for you to sit down without stressing the buttons. I used a 5x man's shirt I got from the thrift store for $2.
  • 1 Spool of ribbon or bias tape Enough to go around you and tie in the back with ease
  • Scissors
  • Sewing machine (unless you want to so this by hand)
  • Pins
  • Calk or other marking tool
  • Thread to go with shirt/ribbon
  • Measuring tape
  • Quilter's ruler
Step one - Try on the shirt and pin to mark the following places:
  • Where your shoulder lands
  • Center of boobs
  • Under boobs (Move the material close up under your boobs so that you accomodate your girly curves
  • Your wides point (usually your hips)
  • Pin along the sides until the excess fabric is taken up and you have added shape. Don't go super tight here as you will need some of this fabric for the fitting darts back and front later. And you want t be able to move.

Step two - Mark and cut

  • Cut of the sleeves leaving the seamed bit with the sleeve you cut off
  • Button up the shirt and lay it out as flat as possible (iron if needed) and fold in half with buttons on the outside.
  • Redraw the arm holes up to the pin make you made for your shoulder. Take some of the curve out of them. Cut out your drawing leaving a .5 in seam allowance.
  • Redraw the side seams along the pin marks you made. Cut and pin leaving a .5 inch seam allowance.
  • Cut open the sleeves (removing any surged edges) and lay the material flat. Place good sides together and fold in half along the top of the shoulder seam.
  • Lay along this folded bit down next to the shoulder line of the shirt. You are gonna make a quarter circle shaped sleeve here. Draw a curved line from the bottom of the armpit to the shoulder edge and cut out. Leave a little bit of seam allowance for a rolled edge finish on the sleeve.
  • Attach the sleeve to the shirt. There is a great tutorial on how to do that at http://www.whatthecraft.com

Step Three.
  • Sew up the sides and try it on. Check out the fit. It should be still sorta baggy cause you haven't added darts or gathers.
  • Mark a line with chalk under the boob where you pinned before.
  • With the shirt on, and some pins pin a small area of gathers under each boob to give yourself some curve. It doesn't have to be super tight cause you are gonna be able to tie it and you will be adding darts in the back.

Step four -

  • Take it off and add but darts to the back. You can use a tape measure and feel along your back to find out the area in the middle of your back... what you are trying to to is measure an area in the middle of your back where each end is roughly over the center of each bum cheak. You can also use a fitted skirt to match up dart location.
  • Use a ruler and even out and make darts on the inside back of the shirt. I am not going to explain how to make darts cause there are way better tutorials out in the interwebs.
  • Next take out your ruler and under boob trim.... Mark out and pin the ties on the front of the shirt... use your ruler to pin the gathered area evenly on both sides. You will pin the ties from the button line to the side seam of the shirt.
  • Before you sew either th darts or the ties, try it back on inside out and adjust sides, darts and ties as needed for a comfy fit... sit down!!!!! other wise you may end up too tight. Don't pin yourself.

Step Five - Sew it all down... darts and ties.
Ad any other embellishment you would like... and done!

Tuesday, March 31, 2009

A basic list of components for the underbust corset

  • 1 eyelet per .75 inch (so a 15 inch underbust corset will have 20 eyelets)
    Or pre-made eyelet tape up to 1 inch longer than your measurement (when they cut it for you make sure that you are getting an even amount of material top and bottom)
  • Between 6 and 10 yards of lacing or go here to use this handy calculator:
    http://www.hobbleskirt.com/CorsetLaceCalculator.html
  • Busk - Now when picking up a busk pick one that allows for the space you will need to sew in your binding... if it significantly shorter but you still want that nice smooth stiff finish you can place an extra bit of boning in the channel behind the busk that gets as close to the bound edge as possible.
    For example:  If you have a  13 inch  edge at the front the best busk will be 12.5 inches giving you a quarter inch to bind the top and bottom edges. But if you can only get a 12 inch or 11.5 inch busk then you will need to place slim bone behind the busk in each channel at the desired length.
  • I use this formula 2 bones for the back at the lacing, 2 bones per seam or gusset and one per busk if needed (see above). You may or may not want extra bones depending on how many panels your corset is made up of.
    For example: I used a 5 panel design to I ended up with 18 bones of various heights. I used steel bones for the channels by the lacing and cable ties cut down for the rest. This equal to one package of 20" cable ties.  Note if you are using steel bones you can't cut down measure carefully and remember the space you need for seam binding.
  • Fabric should be between 7/8 to 1 yard per layer. Now I know you might be freaking out cause coutil is major bank (approx. $25 to $50 per yard). But when you first start out you can use canvas at $12 dollars a yard or med. weight cotton twill for as little as $5 per yard.
  • Thread... lots of thread in matching colors to your fabric
  • Needles suitable for your machine and fabric types  
  • Pattern (make or buy one)
  • sharps
  • Binding. This is the trim binding for the edge of the corset. You can making bias tape out of material (buy extra) or use petersham ribbon. This will be a about 3 yards... just think of your measurements at hip and bust add 10 inches for wiggle room and there you have it.
    Example: My ribcage under bust measurement is 43 inches, my hip measurement is 54 inches for a total of 97 inches. I add 10 to get 107 inches and then divided by 36 to get the yardage (estimating up) for 3 yards of binding. You will need the same amount for your trims depending on the desired finish. 
  • A thimble. Yes, really otherwise you will end up bloody.
  • A sewing machine
  • Utility scissors
  • Basic sewing equipment (pins, scissors, a ruler, tailor chalk and the like.)

Monday, March 23, 2009

Underbust Corset - Deconstructed Tree

This is the second corset I ever made and the first attempt at making one the "proper" way and not being all costume-riffic with it. The piece is a combination of machine and hand stitching. I created it from scratch including the pattern after reading huge  amounts of things on line including some awesome tutorials and advice here.

It  is made out of inexpensive materials as this was a "learning" corset. Mostly cotton twill and denim with cable ties for most of the bones though I did use real steal bones for the area around the eyelets and a good steal busk. The trim was designed with muslin and netting to give that de-constructed look and the bottom trim was this great fuzzy black yarn I found. I was looking to extend the organic feeling of the roots.

This was a great learning experience and I hope to do another really soon. Here are some very poor pictures I took on sunday.

ubc_tree2


ubc_tree

Wednesday, March 11, 2009

50's Skully Apron

Okay this post will be edited to include action shots and a downloadable pdf pattern.

skullyapron2
skullyapron1

Materials
about 1.57 yards of material in any combination half is lining for the pockets and apron
Iinterfacing 22 x 2 inches
thread to match your fabric
scissors
sewing machine
approx 25 inches of trim or more depending on how you want it to look.

Cutting
Add a .5 inch seam allowance to cut edges (but not on the fold) of the pieces in the pattern

1 Apron front
1 Apron lining (see fold line on pattern)
2 ties 5 x 30 inches (this includes seam allowanc
1 waistband 5 x 23 inches

Sewing
  • Sew the waistband and ties pieces together to get one long strip that is  5 x 82
  • Fold in half good sides together and sew the edges closed EXCEPT the 22 inch waist band
  • Clip corners and press the seams back, paying special attention to the waist band
  • Sew the pocket bit – place the pocket and the pocket lining good sides together and sew the top edges together. 
  • Clip the corners and turn right side out and press down the seam and face stitch this top edge for strength. 
  • Baste the curved edge together at a .25 inch seam allowance. Add any trim needed at this time... I didn't because I had a busy print already. 
  • Now place your pocket bit on top of the good side of the front of your appron. line up the edges and pin down 
  • Next mark out your pockets with with a ruler and tailors chalk. Sew down the sections to create smaller pockets
  • Next you need to make a sandwich of the pieces with the good sides facing in. I place them in this order. Front with pockets. Edge trim facing in. Lining good side facing in. Once everything is lined up sew the curvy edge. Notch the curve (take little v chuncks out of the curviest part) and press down the seams. Turn right side out and press down. Face stitch around the curvy bit if desired at this point. 
  • Find the middle of your apron bib and the middle of your waist band. Tuck (and pin) the apron into the gap in the waist band matching up these two bits. Continue to tuck the apron in making small gathers when you get to the sides. Make sure your gathers are even on both sides. Sew down and you are done!
This is just my plus size version with added pockets... I got all the ideas from this awesome craftster: http://www.craftster.org/forum/index.php?topic=38097.0 

Wednesday, February 25, 2009

Upcycled big button down man's shirt to girly office shirt

So I didn't get any before pics but oh, well.

Here she is:

Black shirt recon finished

Black shirt recno - detail

I will edit this post to include a tutorial if I get bored enough to write one.

Tuesday, February 24, 2009

shit I gotta get done

Tasks
Take pictures of the following:
  • grey shirt recon
  • black shirt recon
  • blue shirt recon
  • black and blue corset outfit
  • Jeans skirt 
  • Red and black dress 
Take new face shots of self cause everything you have on line is older than dirt.

Make vest from pattern (get lining material - see thrift store for deal and for sheets to make mock ups of)

Find light over coat or frock coat pattern for wearing over event cloths. Then get stuff to make it.

Finish tree corset

Make little halter dress from black materials

Make short circle skirt pattern from thrift store sheets

Make longer circle skirt pattern from thirft store sheets

Thursday, February 19, 2009

Corsety fun

So I have my material (a cotton twill I think might be too light weight)

I have cut out to of each piece (two left two right) with seam allowances on the sides. Now I gotta figure out my construction method. I am winging it as you can tell.

I want the result to be artistic, somewhat rough and de-constructed with maybe a nod to the steampunk aesthetic without going over the top. Of course I want all that with rock sold construction.

So I was thinking of doing it like this.

Take my mock up and sketch out mock trim and free hand my design with a sharpie

Try it on and adjust it

Then transfer the design to the unassembled pieces of the outer layer. The seams allowances are chalked to knowing where to put the design shouldn't be a issue.

Next face stitch my design in

Then get out the embroidary hoop and add any extra bits that need adding

Then I think I am gonna work the assemby like this:
  1. First the inner layer I am going to sew together and add a band at the waist for support
  2. Next I am gonna sew together the outer layer 
  3. Then I am gonna install the busk... I am still not clear on how to do this but I think that is lack of confidence more than anything. 
  4. Now I am not sure if I am going to use my boning tape or just sew the channels straight in or not.. and I am thinking of using a combination of panels, store boning and cable ties, and proper boning. If I am going to use the tape it is now or never.
  5. Now to intall the grommet tape. First sew the outer edge together to create the slim boning channel
  6. Next I am going to turn back the extra seam allowance for one of the set's of boning channels and pin bast the inner layer, grommet tape, and outer layer together into a sandwich with the right sides and tape facing in.... and slowly sew it together one row of stitching next to the grometts.
  7. Then turn it right side out and face stitch that line down.
  8. then turn it right side in and use the extra grommet tape to measure out a channel for the fat steel bones.
  9. then turn it right side out again and sew the channel in as tight as possible.
  10. Next sew the remaining channels at the seams (this is where I have to decide to have exposed channels or just use the two layers to make the channels... I think I will use the two layers since I did a design on it at the beginning.
  11. Next I am going to add my trim to the top and bottom (lots of hand bits) being careful not to close the channels
  12. Next I am going to sew closed the bottom with at least a few rows of stitching
  13. Install the bones
  14. Sew the top closed
  15. Re-enforce the bone ends with stitching (aka flossing)
  16. Add the finished edge
  17. lace her up
  18. dance for joy

Friday, November 21, 2008

man's dress shirt - reconstruction - deconstructed look

This is a moderate reconstruction of a man's dress shirt that fit just a tiny bit big but not big enough to take all the way apart and put back together again.

Take a boring old man's shirt like this:


Turn it into a deconstructed semi victorian fitted shirt  like this:


Stuff you will need

  • scissors
  • a sewing machine
  • thread in the color of the shirt or close
  • a needle
  • elastic (thin or small)
  • Lace (optional - I like to salvage lace off other stuff I find)
  • a shirt that fits you as described above
  • chalk 

Phase One

You can use pins or chalk whatever you like and you should be wearing the shirt to make the marks.
Mark across where  the tightest part of where your boobs are (mark A)
Mark under where the curve of boob are (Mark B)
Mark across the center of each boob where it sticks out the most (Mark C)
Mark where you would like your new shirt to land (ish) (Mark E)


Cut off the bottom the shirt you don't need (cut through both sides) as set aside material for later. Start this cut about 2 or 3 inches below the line you made for the bottom of the shirt (Mark E). This 2 or 3 inches is for the ruching and for the hem... so if you use hem tape don't work about it. And the more you leave after the mark the more tucks you will have in the ruching. Next run a temp basting stitch allong the sides seams down the the end of the shirt and take up the left over 2 or three inches for temporary ruching. Do it on both sides.

Now put the  shirt back on and make these marks:

Nip in to the smallest part of your waist and mark it (Mark D)

Make sure the marks are really clear. Take the shirt off and take out the temp ruching.


Phase 2

Cut off the "wings" part of the collar as close as you can. but leave the ring with the top button.
Make a pattern and mark out the ovally front darts. This is how I make the pattern for the front darts. Measure from the edge of the shirt to where you made mark (D). Compare those measurements on both sides and even them up... so if one side was 3.5 inches but the other was 3 inches split the difference and you should get 3.25 inchs... do this on the front and the back to even up your math. Oh, when I am doing this I am only going from the seam to the mark on one side of the shirt. Let's pretend the averaged number was 3 inches. So this is the most fabric I need to get rid of on the front — meaning that I need each diamond to be 1.5 inches across at its fattest point. Now you need to figure out now far down and up each dart needs to go. Measure from B to D and that is the top of the diamond. Lets say for fun it is 6.5 inches. Measure from B to E and that is how tall the total dart is - lets say 10 inches. So the bottom part of the dart is gonna be 3.5 inches. Like this:
 
Now the back dart is made the same way except you make it go all the way up to mark A. 
The darts in the back should be about 8 inches apart or line up roughly with your shoulderblades.  The darts in the front should line up with mark C. I tried to diagram it here:
  
Try it on and adjust the darts as needed. Remember you are gonna ruch up the sides though! After you are done there are two ways to ruch the sides. You can rebaste, scrunch it up the way you would like and then sew it down.  Or you can do it with elastic. Measure from the top of the side seam to mark E and cut a piece of elastic that long. Sew it to the inside of the shirt while streatching the elastic... there are lots of tutorials on how to do this at places like crafter.org.
Phase Three:
Now lets start the fun stuff. Collar and cuffs With your shirt on mark where the end of your wrist hits... do this with your arms slightly bent... otherwise it will pull alot when you wear it.
  
Now cut off the cuff about .5 to 1 inch above the stiff part of the cuff then cut off and sew uu any extra sleeve detail bits. Cut and sew as close as possible to the existing seams and make sure you can get your hand comfortably through the sleeve.
Now fold back the sleeve until you have it just a tiny bit more than your desired lenght... make sure to do this with the cuff bit you are gonna add back taken into account. 
 
Now pin the hard cuff back on... you will most likely have to add tucks and ruffles at this point. as you bit in the extra bit stick your arm through and see if you like where they land. Adjust as needed and sew on just below the hard bit of the cuff. Trim off any extra to get the desired even deconstructed ruffle effect desired.
As a variation you could also add lace or anything else to the sleeve instead of folding it back.
  
Now for the collar. measure around the collar and then add half again to that number plus one inch. So if my collar was 18 inches the number I would get would be 28 inches. Take the left over material you cut off the bottom. and cut it in 1.5 inch wise strips until you get enough to make up the number you came up with. Run a basting stitch through one edge of the strip you made and ruffle it up like so:
  
Once you have a ruffle you like pin it to the collar of your shirt and sew it on. Watch out for breaking your needles if the fabric has been starched or is way stiff. I like to sew once at the top and once at the bottom of the collar for a nice finished look.  Try your cool new shirt on and trim down the collar to the place you like ... do it in steps other wise you will have to re do the collar. You could also add lace instead of material if you wanted for this step.

 
Feel free to ask any question  and I would love to see anything anyone else has made.

Tuesday, November 18, 2008

Big Cardigan tucked down

  1. Try on the cardy and mark where your shoulders really are in the sweater (not the seams of the sweater's shoulders but your actual shoulders). Also mark where you boobs are — say in three lines to of boob, middle of boob and just under the boob. 
  2. Do the math to figure out how much of the sweater you are gonna have to tuck up to get the shoulder seam to come to the place your shoulder is. Figure out how many tucks you want and mark them out in chalk with a ruler. 
  3. Pin and sew. Keep in mind you can always take more tucks but ripping them out is gonna be a way bigger pain than it will be worth. 
  4. if it is still baggy on the bottom use pins and pull a bit from the back and a bit from the front to find out how much you will have to tuck ... you want to place your front and back tucks about the same place you would find princess seams or darts. Do the math, mark it out and pin it up... try it on before you sew.. and as you tuck.. do one set of tucks, try it on, and keep tucking until you get the fit you want. 
  5. Next, if the sleeves are to big you can tuck them too. With the sweater on mark how much you are gonna have to tuck up as well as were on the sleeve you want the tucks to show. Do the math, mark it out and sew those tucks on up... I am trying to mimic a fairly deep cuff on mine.