- 1 eyelet per .75 inch (so a 15 inch underbust corset will have 20 eyelets)
Or pre-made eyelet tape up to 1 inch longer than your measurement (when they cut it for you make sure that you are getting an even amount of material top and bottom) - Between 6 and 10 yards of lacing or go here to use this handy calculator:
http://www.hobbleskirt.com/CorsetLaceCalculator.html - Busk - Now when picking up a busk pick one that allows for the space you will need to sew in your binding... if it significantly shorter but you still want that nice smooth stiff finish you can place an extra bit of boning in the channel behind the busk that gets as close to the bound edge as possible.
For example: If you have a 13 inch edge at the front the best busk will be 12.5 inches giving you a quarter inch to bind the top and bottom edges. But if you can only get a 12 inch or 11.5 inch busk then you will need to place slim bone behind the busk in each channel at the desired length.
- I use this formula 2 bones for the back at the lacing, 2 bones per seam or gusset and one per busk if needed (see above). You may or may not want extra bones depending on how many panels your corset is made up of.
For example: I used a 5 panel design to I ended up with 18 bones of various heights. I used steel bones for the channels by the lacing and cable ties cut down for the rest. This equal to one package of 20" cable ties. Note if you are using steel bones you can't cut down measure carefully and remember the space you need for seam binding. - Fabric should be between 7/8 to 1 yard per layer. Now I know you might be freaking out cause coutil is major bank (approx. $25 to $50 per yard). But when you first start out you can use canvas at $12 dollars a yard or med. weight cotton twill for as little as $5 per yard.
- Thread... lots of thread in matching colors to your fabric
- Needles suitable for your machine and fabric types
- Pattern (make or buy one)
- sharps
- Binding. This is the trim binding for the edge of the corset. You can making bias tape out of material (buy extra) or use petersham ribbon. This will be a about 3 yards... just think of your measurements at hip and bust add 10 inches for wiggle room and there you have it.
Example: My ribcage under bust measurement is 43 inches, my hip measurement is 54 inches for a total of 97 inches. I add 10 to get 107 inches and then divided by 36 to get the yardage (estimating up) for 3 yards of binding. You will need the same amount for your trims depending on the desired finish. - A thimble. Yes, really otherwise you will end up bloody.
- A sewing machine
- Utility scissors
- Basic sewing equipment (pins, scissors, a ruler, tailor chalk and the like.)
Showing posts with label corsets. Show all posts
Showing posts with label corsets. Show all posts
Tuesday, March 31, 2009
A basic list of components for the underbust corset


Monday, March 23, 2009
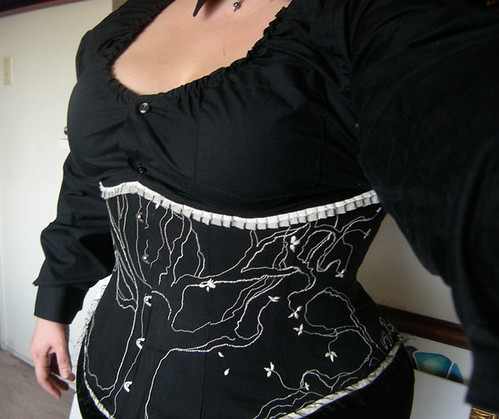
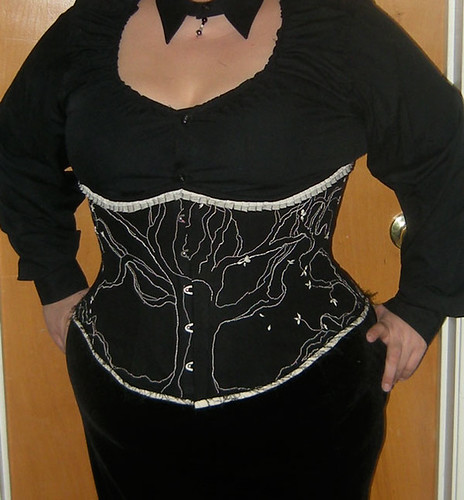
Underbust Corset - Deconstructed Tree
This is the second corset I ever made and the first attempt at making one the "proper" way and not being all costume-riffic with it. The piece is a combination of machine and hand stitching. I created it from scratch including the pattern after reading huge amounts of things on line including some awesome tutorials and advice here.
It is made out of inexpensive materials as this was a "learning" corset. Mostly cotton twill and denim with cable ties for most of the bones though I did use real steal bones for the area around the eyelets and a good steal busk. The trim was designed with muslin and netting to give that de-constructed look and the bottom trim was this great fuzzy black yarn I found. I was looking to extend the organic feeling of the roots.
This was a great learning experience and I hope to do another really soon. Here are some very poor pictures I took on sunday.
It is made out of inexpensive materials as this was a "learning" corset. Mostly cotton twill and denim with cable ties for most of the bones though I did use real steal bones for the area around the eyelets and a good steal busk. The trim was designed with muslin and netting to give that de-constructed look and the bottom trim was this great fuzzy black yarn I found. I was looking to extend the organic feeling of the roots.
This was a great learning experience and I hope to do another really soon. Here are some very poor pictures I took on sunday.
Subscribe to:
Posts (Atom)