
Monday, December 6, 2010
Shoe lust
I have almost reached the ripe old age of forty and up until now never WANTED a pair of shoes the way I want these.
Thursday, November 11, 2010
#298 Drafting #288 Painted Lettering
So a good friend did this amazing standee for an awesome wedding. I helped by drafting the type (3 different creatives) and then painting it with him.
Here is a snapshot... I will try to get close ups soon too.

Here is a snapshot... I will try to get close ups soon too.

#299 Recon 30's style dress


I was inspired by these looks from the 30's.


Tuesday, November 9, 2010
#300 Black and Cream Vinty Recon Dress Idea
So in order to tackle a project I really need to think it through. This starts with sketches and a plan.

Stuff needed
P.S. Okay, So I promise not to count the dress too when I finish it.

Stuff needed
- 4 buttons (possible to snatch off bottom of shirt)
- Small (10 in x 10in) Scrap of thick black fabric
- Loose fitting man's shirt
- 2.5 yards black cotton fabric (I will use a strippy kind)
- Black thread
- Pins
- scissors
- sewing machine
- Dress Form*
- chalk
- Butterick 5001 (for the skirt part) Or any mid calf stretchy skirt pattern
- Make the skirt from the pattern
- Take the loose fitting dress shirt, and place inside out on the dress dummy, tack down the side seams and center front with pins and tape so it doesn't shift around.
- Press the shirt firmly down the boob and use a spare piece of elastic to test how it will fall when you cut off the bottom.
- Pin any darts in the back and fiddle with gathers needed for the girls, mark all with chalk including marking the cut line all the way around.
- Take the shirt off the dummy, clean up the cut line and cut the bottom off the shirt 1 inch below the cut line.
- Sew in any needed darts and put back on the dress form. Check and mark places for gathering etc. Then put the shirt on the dress form inside out
- Tape the skirt to the dress form
- The drappy middle bit is going to be two layers. One for the ruched effect and one for structure. Measure from the waist of the skirt to the bottom of the shirt all the way around. Average out the numbers and divide in half. Add .5 inch seam allowance. Cut from black knit fabric. Now add 50% to 100% more to the height of those pieces and also cut out of the Knit fabrick... this will be the outside.
- Next Sew the sides of the tall bits together gathering along the side till it is the same height as the short bits.
- Sew the short bits together.
- You should have to tubes at this point.
- Next match up the short tube to the bottom of the shirt. With the right side of the tube facing the wrong side of the shirt. Match up the sides and center (front &Back) then pin. Next match up evenly about 2 inches of matertial from the sides to the center front. Stretch and pin the remaining knit fabric along the front of the shirt, careful to remain even on both sides.
- Take off the dress form.
- Take the ruched up band and with the right side of the band facing the right side of the shirt pin it to the bottom of the shirt making a sandwich... match up sides and stretchy bits to the short band.
- Sew to the bottom of the shirt, being sure to stretch when needed with a .5 inch seam allowance.
- Flip bands down. You should have a nice finished edge at the bottom of the shirt and all the sides should match up.
- With the right side of the top facing the right side of the skirt, match up the sides and pin and sew first at the .5 inch mark. Then again at the .2. inch mark for a nice strong waist. Flip up seam and tack to top
- Embellish the front with 2 button frogs made from the extra shirt bits and scraps. Possibly use shirt scrap fabric to embelish the skirt.
P.S. Okay, So I promise not to count the dress too when I finish it.
Wednesday, November 3, 2010
#301 Quick Creepy Halloween costume
I needed a costume in 3 seconds or less... and I had lent out all of my stage make up. Soooooooooo... So I came with this Typhiod Mary costume (name tag not shown)


#302 Embelishment on a killer Fallout Costume


So I modified a wide collared jumpsuit added magnetic button and yellow piping as well as a yellow fabric top stitched 13 on the back. More pic's coming soon.
#303 My friend's Head - Now in Blue
So I don't have pic's of the finished because I am apparently exceptionally crap at visual record keeping.
Either way My friend has good dark latin hair... so we bleached it all to hell and then went blue and green... hmmmmm good times!
Here we are in action.

Either way My friend has good dark latin hair... so we bleached it all to hell and then went blue and green... hmmmmm good times!
Here we are in action.
#304 Omlete de whatever is in the fridge
So I has lovely spur of the moment guests for dinner.... and not a lot of options for food... so we hand pretty omletes with mushrooms and avocadoe and grilled leftover peppers done all saucy.
Hmmmm... Saucy.


(pssst. I know this one may be considered weak, but hell I never made this exact omlete before so there.)
#305 Vintage Apron
This number is done out of out of some awesome amy butler fabric for a really good friend. I will look up the pattern shortly and list it.


#313, #312, and #311 Brand comps for my friend at Fresh Bit Baking
I put together 3 ideas for their brand that included Logo, image philosophy, typography, iconography. To illustrate how these elements would work together for each idea I worked up very rough drafts of a website, a pastry case card and a business card. The final product was a variation on one of these and can be seen in action at freshbitbaking.com
Below is a picture of the brand board we used for conversation.
(Pic coming soon I frickin' swear... I didn't wait long enough for them to transfer to this drive. Doh!)
Below is a picture of the brand board we used for conversation.
(Pic coming soon I frickin' swear... I didn't wait long enough for them to transfer to this drive. Doh!)
#314 Flaming pink burka
This number is super simple to make and was made for a crossdressing friend to take to the playa… no pic's on the playa due to camera loss (grrrrrrrrr)
But I promise to post pics of it I dug up very very soon.
But I promise to post pics of it I dug up very very soon.
#315 Camo florecent Mermaid skirt
This playa bound number for a friend of mine, was made of a stretch cam print denim following a basic pencil form but I altered the hemline and then added a ripply twirly 5 inch trim to get that mermaid effect… in florescent yellow. For all the world it look like I killed a hunter in a safety vest and skinned it to make this skirt. I will stitch it out. But it is pretty similar to this number I did a while back only It was custom to a much slimmer figure as well as not being done in knit… so I added a zipper to a side seam.
Pic's unavailable to do playa camera loss. I am very sad.
Pic's unavailable to do playa camera loss. I am very sad.
#316 Little Piggy Circle skirt
So this was playa wear for a friend of mine.. and nary a picture was taken. Well they were taken but the pictures are nowhere to be found as the camera itself grew legs… playa legs. Dirty hippies.
Anyhow it was a supper cute circle skirt with this fabric.
Knee length, with a ruffled tulle trim in dusty pink and a elastic waist band for comfort. Go flannel.
(Picture of at least the fabric coming soon]
And lookee here. I followed through!

Anyhow it was a supper cute circle skirt with this fabric.
Knee length, with a ruffled tulle trim in dusty pink and a elastic waist band for comfort. Go flannel.
(Picture of at least the fabric coming soon]
And lookee here. I followed through!

#318 & #317 Chicken with Apricots and Garlic
So I am counting this one as a twofer cause after doing the first one I worked out a variation. Wheeee
This was first invented during a summer camping trip with great friends up in Hendy Woods. Not a lot of planning was involved cause we were only feeding 8 people.
Saute the garlic until golden and remove right way from heat. Add the flesh of the lemon (no seeds) and the zest (finally diced) as well as the diced browned garlic and finely chopped rosemary. Season with salt and pepper, mix well with a tiny bit of olive oil.
Cut pockets in the cleaned chicken breasts and stuff with the mixture you just made. Between the tenderloin and the breast place a whole spring of rosemary and lightly season with a tiny pepper (lemon pepper is good). Lay a layer of prochuto across that side of the chicken sealing it off. Brush other side with olive oiled and place on the hot grill prochuto side up. Cool for 5-7 min depending on size of the breasts. turn over and grill on the prochuto side and grill the rest of the way. If needed turn as you go more often to get it evenly cooked.
For the Roasted version you vary it a bit. Add more lemon for started.
First use a whole chicken.
When making the stuff do the following:
Saute the garlic until golden and remove right way from heat. Add the flesh of the lemon (no seeds) and the half the zest (finally diced) as well as the diced browned garlic and finely chopped rosemary. Season with salt and pepper, mix well with a tiny bit of olive oil.
take the remaining zest and and mix with corse sea salt (about 30/70)
Cut the back out and big thighbones out of a whole chicken "flattening" it. Use a spoon to loosen the skin and rub with butter. Cut a pocket in the meat of each breast. Stuff the gaps in the thighs and the pockets in the breast meat with the mixture you made.
In the roasting pan, place the remains of the lemons, rough sliced onions and other common roasting veg. (apples, oranges, carrots, potatoes, peppers) creating a bed that you will place your chicken on. And now you guessed it place the stuffed bird on it. Rub the skin with the salt zest mixture until well coated. fill roasting pan with about a quarter inch of broth or water (I make broth with the extra chicken parts while I am doing the rest of the prep for this :-). YOu don't want too much water otherwise you will steam your bird and end up with flavorless floppy skin.
Place in a HOT, HOT oven 475 at least. for 20 min. After 20 min reduce the temp to about 400 or so, and roast for another 25 min or so… depending the size of your bird and the goodness of your oven. Check about every 15 min to ensure there is liquid in the bottom and your veggies aren't burning.
Check the leg for doneness before pulling from the oven. Let stand for 5 min before cutting into it otherwise the product will be dry and crappy.
This was first invented during a summer camping trip with great friends up in Hendy Woods. Not a lot of planning was involved cause we were only feeding 8 people.
- Boneless, Skinless Chickbreasts
- Fresh rosemary
- garlic
- dried apricots
- lemons
- sea salt
- pepper
- olive oil
- percuito
Saute the garlic until golden and remove right way from heat. Add the flesh of the lemon (no seeds) and the zest (finally diced) as well as the diced browned garlic and finely chopped rosemary. Season with salt and pepper, mix well with a tiny bit of olive oil.
Cut pockets in the cleaned chicken breasts and stuff with the mixture you just made. Between the tenderloin and the breast place a whole spring of rosemary and lightly season with a tiny pepper (lemon pepper is good). Lay a layer of prochuto across that side of the chicken sealing it off. Brush other side with olive oiled and place on the hot grill prochuto side up. Cool for 5-7 min depending on size of the breasts. turn over and grill on the prochuto side and grill the rest of the way. If needed turn as you go more often to get it evenly cooked.
For the Roasted version you vary it a bit. Add more lemon for started.
First use a whole chicken.
When making the stuff do the following:
Saute the garlic until golden and remove right way from heat. Add the flesh of the lemon (no seeds) and the half the zest (finally diced) as well as the diced browned garlic and finely chopped rosemary. Season with salt and pepper, mix well with a tiny bit of olive oil.
take the remaining zest and and mix with corse sea salt (about 30/70)
Cut the back out and big thighbones out of a whole chicken "flattening" it. Use a spoon to loosen the skin and rub with butter. Cut a pocket in the meat of each breast. Stuff the gaps in the thighs and the pockets in the breast meat with the mixture you made.
In the roasting pan, place the remains of the lemons, rough sliced onions and other common roasting veg. (apples, oranges, carrots, potatoes, peppers) creating a bed that you will place your chicken on. And now you guessed it place the stuffed bird on it. Rub the skin with the salt zest mixture until well coated. fill roasting pan with about a quarter inch of broth or water (I make broth with the extra chicken parts while I am doing the rest of the prep for this :-). YOu don't want too much water otherwise you will steam your bird and end up with flavorless floppy skin.
Place in a HOT, HOT oven 475 at least. for 20 min. After 20 min reduce the temp to about 400 or so, and roast for another 25 min or so… depending the size of your bird and the goodness of your oven. Check about every 15 min to ensure there is liquid in the bottom and your veggies aren't burning.
Check the leg for doneness before pulling from the oven. Let stand for 5 min before cutting into it otherwise the product will be dry and crappy.
#319 Dios de los Muertos painted faces
so I did my face and a friends for the parade in the Mission district of SF. I learned two things on this night....
1) Full wedding petticoats are freakin' HEAVY and HOT
2) Copious amounts of white people who don't even bother to dress piss me off.

1) Full wedding petticoats are freakin' HEAVY and HOT
2) Copious amounts of white people who don't even bother to dress piss me off.
It seems I suck at blogging
but not so much at doing projects. I swear I will catch up. I will I swear. I have so many project to enter. Like 100. Damn. Grrr. I was gonna try to enter them in the order I did them but well that ain't gonna happen I think. Cest la vi.
Thursday, September 23, 2010
More inspiration
I found this on one of my crafty pron sites... I really like there stuff even if the copy in the "about" section is a bit pretentious. The textile art on the other hand is just lovely.
http://www.gibbousfashions.com

http://www.gibbousfashions.com

Friday, September 17, 2010
Inspiring thing
So I just saw this rather cool but pricey Marc Jacobs sweater... I am popping a photo into this hear blog because I just know that doing a recon version would a) be cooler and b) be way less pricey.

Marc by Marc Jacobs Kelly Sweater - $228
Great with a mini or maxi skirt - we love the button detailing on this sweater from Marc by Marc Jacobs.
Friday, August 27, 2010
#322 Cherry Terror Website
Doh! I almost missed number #322! This is a website for an amazing performer friend of mine Cherry Zonkowski! She had an amazing run at the Marsh recently. Her website was build using custom them for the Wordpress platform so that it could be upgraded easily.


#321 New version of the Jellyfish Gallery Website
So things constantly grow and evolve and that goes for the needs of the folks I build for too. The super good folks at the Jellyfish Gallery needed to upgrade their site. This is what we are rocking right now. It is a Wordpress 3.0 custom theme using the arras theme core. There are still some tweaks to be made but all the functionality is there. (oh, and of course some hacks for IE users.)

#328, #327, #326, #325, #324, #323 Monthly Bawdy Graphics January through June
In an effort to catch up with my blogging and in order not to go stir crazy while I am sick I thought I would gang up some projects in single posts - well when they go together. These are an easy one to do because the dates are in the graphics ;). This art can be seen in context at bawdystorytelling.com


Saturday, August 21, 2010

#330 My little pony poncho of doom
For that thing in the desert (not for me, for a friend).
I dont' go to that thing in the desert. I don't like being uncomfortable. I don't like dirty hipsters. I don't like dirty hippies. I dislike e-tards. On the other hand I love LOVE love making stuff. And my friend needed a My Little Pony Poncho, so I was compelled to make one. It is modeled here by my youngest boy. The dance moves are his own.
I dont' go to that thing in the desert. I don't like being uncomfortable. I don't like dirty hipsters. I don't like dirty hippies. I dislike e-tards. On the other hand I love LOVE love making stuff. And my friend needed a My Little Pony Poncho, so I was compelled to make one. It is modeled here by my youngest boy. The dance moves are his own.

#332 Fresh Bite Banner
This banner was done on canvas and is used at farmer's markets... I will have a pick up of the real deal as soon as I get one.


Tuesday, July 27, 2010
#334 Games of Berkeley Wordpress theme
So this one may look (and be) less then wildly creative... but hey not everything can be a masterpiece.
I used this awesome free theme called Arras which is a well supported theme framework
and created a branded child theme for Wordpress 3.0.
This theme is designed for the staff to use... they have variable skill levels with web, design and wordpress but are an all round great bunch of folks. It will be live just as soon as a few modifications and content upload is completed by the staff at Games of Berkeley.
This essentially is what it will look like:

This is the before shot:

Sunday, July 25, 2010
#335 My first function from scratch
This is the first function I have ever written from scratch. Usually I just copy and tweak for this kind of thing but it was so simple I thought I would give it a shot... I am using the thematic framework and creating a custom child them.
As soon as this code is live I will post a link to the live site.
And while I wish I could show the code here the bloger wysiwyg will not let me show anything... I keep getting a funky HTML cannot be accepted dealy. Grrrrr.
Now I know this doesn't sound "creative" per se, but damn it I am happy with it and I wrote it so there.
#336 Fresh Bite Website
So this is a site I designed a loooooooong time ago. Like 4 whole months ago. I am currently refreshing the design now that my super cool baker friends have content and are setting up ecommerce.
Check it out. freshbitebaking.com

Check it out. freshbitebaking.com

Long time no blog
But the creation has been fast and furious. I swear. I am only a little bit behind the numbers and from now on I am going to try two entries a day until I catch up. This also mean that things are going to be wonky as far as order goes. Who new blogging was so much work... before it has always been play.
Sunday, April 11, 2010
#338 Birthday Card
I wish I had a picture.. but it was pretty. I used Nu Creativo inspired font done in watercolors and then did a watercolor sketch of her living room on the interior... it makes sense to her I promise. I may be able to snap a pic down the line but for the moment I am just counting it on for my "project a day initiative".
#337 The Duct Tape Prom Dress
This was a frickin' blast to make with Mekayla. She was awesome to work with. We thought we had months and months... turns out we had more like 6 weeks. But she was a trooper, heck her whole family showed up and helped on multiple occasions. She was really happy with her dress and looked sooooo cute in the awesome pictures Benjy Feen took last night when she was on the way to the prom with Alise.
The only other thing I have to say is that 6 yards of duct tape fabric turns out to weight a ton... the next time I do a princess cake topper dress I am going back to good old fabric.


The only other thing I have to say is that 6 yards of duct tape fabric turns out to weight a ton... the next time I do a princess cake topper dress I am going back to good old fabric.


Wednesday, April 7, 2010
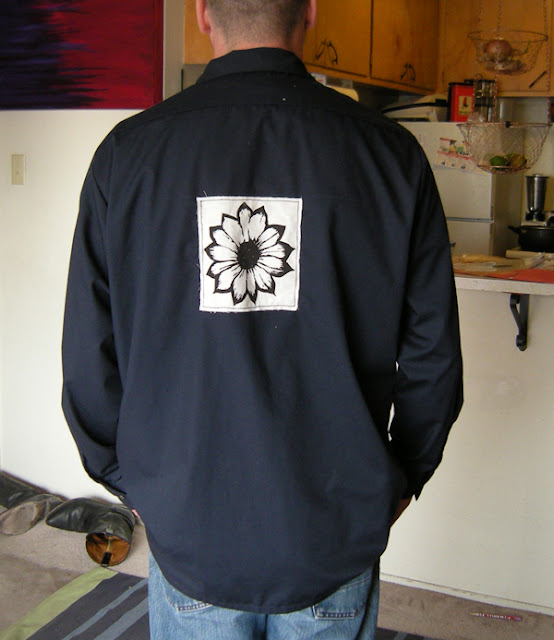
#339 Blue Work Shirt Recon
This is part of the Mine Now start-up. But I did all the applique so here it is. I was going for a contrast of masculine and feminine with a deconstructed edge. Pic's of the arm and front applique to come.


#341 Vintage Inspired Green Earrings
Sorry about the crap pix... will work on better one soon. They really are cute. I swear. Oh, idea. Start taking earring pictures with a scale comparison object.


# 342 Earring Board
My earring were all jumbled up and it was a pain in the ass in the morning to get into my jewelry and pick anything out. And it is not that I have an extensive collection...far from it. I have seen lots of earring boards and other jewelry on the wall solutions but I didn't want anything fooffy or two busy... I was looking for a really functional minimalist (as minimalist as earring displays can be) solution.
So what I made was a pretty earring board.
Materials and tools:
Old thin profile canvas (I hated the painting on it)
Muslin (enough to cover the front and wrap around to the back with 4 inches to spare all the way around)
Polyfil batting (enough to evenly cover the surface of the canvas)
Spray glue
Pretty fabric (I used a scrap of dupioni silk, same dimensions as the muslin)
Thin copper wire
a big eyed needle
Nails or heavy staples
A hammer of stapler
Step 1
Spray a portion of the canvas with the glue and spread the polyfill evenly over the glued area. Repeat until the canvas is evenly covered.
Step 2
layout the muslin and place the canvas in the center, fluffy side down. Starting at one end tack down the muslin to the frame. To to the opposite side from when you started and to the same, pulling the muslin smooth as you go. You don't have to pull super tight just smooth. Add any polyfill to the sides you need to in order to fill gaps as you go.
Step 3
Repeat step 3 with the outer fabric, making sure things are smooth and tight.
Step 4
On the back of the frame, measure about .5 inches down and place two nails on each side of the frame, leaving just a bit of the nail head out to wrap wire around. Repeat down the frame about every 2 to 2.5 inches as pleases you. Next clip off a piece of wire that will span across your frame with a generous bit extra and thread the needle with it.
Step 5
Wrap the end of your copper wire around one nail head and sew spans across your fabric ... keep in mind that the spans will be weighted down by the earrings so don't make them too long. Tip: Use a ruler to measure across and keep your copper stitchwork even... marking the places you will sew though with a pin through the canvas.
And this is what you should end up with:


#343 Blog to help with my little OCD problem
Now I don't really have OCD. At least I don't think I do. ;)
But I do have a love of lists and databases. And I had a problem (detailed here) and this was the solution.
I repurposed a wordpress theme to be my personal database of patterns, fabric, notions and art supplies. I am still tweaking it but I am pretty happy. The designer of the Arras theme did a great job. And I felt a little weird counting it as a "creation" until I realized "Hey, I made this data, I repurposed it to my will... and I will be tweaking the CSS to my sensibilities." They did a great job the functionality is fantastic and it is the most beautiful substrate for my content... which is what I am actually the sole creator of — so there.
Tuesday, March 30, 2010
There Must Be Order
But I swear I have no control issues. Really.
Anyhow I have started to have a respectable pattern stash going. I have commercial patterns (McCalls, Simplicity, Vouge) and specialty commercial patterns (Truly Victorian, Past Patterns) as well as patterns that I have drafted myself. So of course nothing is in a uniform size or shape. Some went back in their envelopes... others maybe not.
Issue #1
When shopping for patterns especially during big sales, how will I be able to tell if I already have a similar pattern already, and in what size? It sucks to find out you have double purchased or what is happening is that I have the same top pattern basically... from 10 different manufacturers.
Issue #2
How can I easily browse my stash so I can do a project... And not just plain loose track of what I got.
Issue #4
How can I access my list of goodies when I am not right in front of the box.
Of course the solution is database. But this magic database has to images... cause I choose things visually. A pattern database without pictures is useless to me.
So I am gonna try to find an on-line tool for this. I wish blogger had widgets for this. That would be sweet!
Here is to the dream. And when I find a good solution I will shout it far and wide, believe you me.
Monday, March 1, 2010


Sunday, February 28, 2010
#344 Corset Mock up
This number is part of a duck tape dress being constructed for a good friend of mine. Wheeeeee. This was for the corset part only. We are working on the skirt bit as duck tape is not so good for the draping. The next step is to get some conductive thread and start working with the lights and possible power sources.
Oh, and source the roller skates.

Oh, and source the roller skates.

Monday, February 15, 2010
poor baby take on tom ka gai
This a poor quick version of Tom Ka Gai. It has lots of room for variation (aka the addition of leftovers)
NOTE: It is best if you prep all your stuff before you start cooking... otherwise it won't go up nicely or things will end up burnt or over cooked.
First onion whites to the pan with a bit of oil, saute until soft on med. Add garlic and ginger and stir fry until just brown on the edges. Add chili sauce stir just a tad, add curry paste, give it a toss and then cover with a bit of the chicken broth... just enough that you can break up the curry paste in... once it is broken up cover with the rest of the broth and bring to a hard boil.
Add mushrooms, bring back up to a decent boil, add fish sauce and a drop of sesame oil.
Add fish, stir, add coconut milk and bring back up to moving, bring back up to hot. Turn off add cilantro and green onion tops. Keep checking for spiciness and salt and add bits of chili or fish sauce in small amounts until you are happy.
Let sit for two min. then serve with a squirt of lime juice on top the bowl. Yum.
So I didn't put this one in as one of the project a day projects cause it is so straight forward. It would be like saying spagetti was a creation of merit.
Good things to add:
Leftover pork chop sliced thin
Leftover chicken shredded
The rind of the lime or kefir leaves
left over veggies from the night before
rice noodles (cooked)
tofu
- Chicken Broth (decent quality)
- Garlic, fresh diced
- Ginger, fresh diced
- Chili garlic sauce (the ordinary chines kind - Can be replaced by some diced thai chili's if you got em)
- 2 cups seafood (prefer prawns diced or scallops)
- Coconut milk
- lime
- green onion (chop the whites and then rough dice the greens, keeping them separate)
- Red Curry Paste
- Good oil
- Fish sauce
- Mushrooms, quartered
- Cilantro rough diced
NOTE: It is best if you prep all your stuff before you start cooking... otherwise it won't go up nicely or things will end up burnt or over cooked.
First onion whites to the pan with a bit of oil, saute until soft on med. Add garlic and ginger and stir fry until just brown on the edges. Add chili sauce stir just a tad, add curry paste, give it a toss and then cover with a bit of the chicken broth... just enough that you can break up the curry paste in... once it is broken up cover with the rest of the broth and bring to a hard boil.
Add mushrooms, bring back up to a decent boil, add fish sauce and a drop of sesame oil.
Add fish, stir, add coconut milk and bring back up to moving, bring back up to hot. Turn off add cilantro and green onion tops. Keep checking for spiciness and salt and add bits of chili or fish sauce in small amounts until you are happy.
Let sit for two min. then serve with a squirt of lime juice on top the bowl. Yum.
So I didn't put this one in as one of the project a day projects cause it is so straight forward. It would be like saying spagetti was a creation of merit.
Good things to add:
Leftover pork chop sliced thin
Leftover chicken shredded
The rind of the lime or kefir leaves
left over veggies from the night before
rice noodles (cooked)
tofu
#345 UC page for Mine Now
Mine now is a new label that is still in the chrysalis stages first conceived by my friend Ben Shaddis. I am partnering with Ben to bring Mine Now to life and of course a web presence is a must. Below is the first page developed and speaks to the look and feel we are going toward for the web page (Click on the image to see a better view). Oh, and credit for the awesoem logo goes to Ben as well. I think it is outstanding.


Subscribe to:
Posts (Atom)